Using AnVIL for teaching R / Bioconductor
Levi Waldron
A case study of using AnVIL to teach R for a Biostatistics course and provides essentials for using AnVIL for other instructional efforts.
Notes
- Doing this on your own will require a billing account. We provide a billing account during the workshop, but if you're following along on your own see 'Set up billing' for options to create a billing account.
- Access to the workspace we use requires registration; please sign up with your AnVIL email address.
Learning Objectives
This week provides a case study of using AnVIL to teach R for a Biostatistics course and provides essentials for using AnVIL for other instructional efforts. These methods are also appropriate for sharing resources within a lab group. This workshop also briefly reviews some applications of GitHub and GitHub Actions in this context. Specific learning objectives:
- Set up a workspace for teaching a course.
- Share AnVIL computing through billing account or shared workspace, and decide which is most appropriate for your use.
- Choose from available billing options:
- Direct from Google.
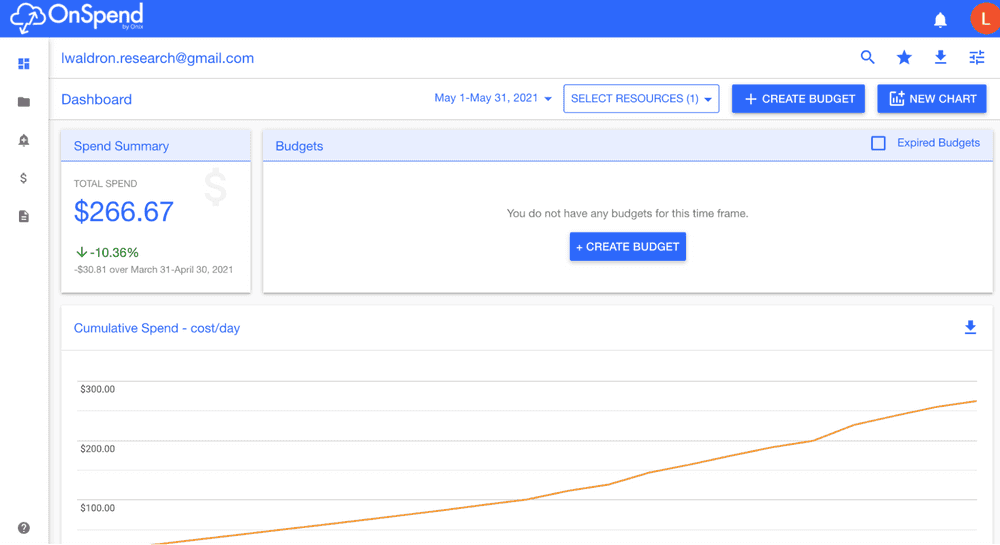
- Pre-paid and post-paid invoices through a reseller such as Onix.
- STRIDES discount program for NIH-funded research using Cloud computing.
- Be aware of some options for using GitHub to deliver course materials to a central course site, DockerHub, and downstream applications.
Key Resources
AnVIL/Terra Setup
Billing
- NIH STRIDES initiative: https://datascience.nih.gov/strides
- Onix re-selling of Google Cloud: https://www.onixnet.com/onspend-cloud-billing
GitHub Templates
- https://bios2.waldronlab.io: course pkgdown website
- GitHub Actions within https://github.com/waldronbios2/cunybios2 (pkgdown, push to Docker Hub) and https://github.com/waldronbios2/templatesession (trigger main site action)
General AnVIL/Terra
- https://anvilproject.org for an introduction to AnVIL. AnVIL provides secure access to open and controlled data resources, and the computational environment required to effectively analyze the data. AnVIL can be used for large-scale workflows processing very large data sets, and for interactive analysis of derived or more modest datasets.
- https://anvil.terra.bio to use the AnVIL platform.
Workshop Activities
- Go through the course movements as a student (from popup workspace)
- Review details of course set up as an instructor
- Discuss options for billing
- Discuss alternatives to AnVIL/Terra
Course setup on AnVIL/Terra
Create a new “Group”
A “group” allows you to provide and revoke access as a group rather than as individuals, and to provide all the same accesses to someone new just by adding them to the appropriate group. You could have groups for your course, lab groups, etc.
- Ask students to sign into anvil.terra.bio using a Gmail or G Suite address, then provide you that email address. They need to sign in before I can add them to the group, but can be added at any later time.
- Under the top-left hamburger icon, clicked on your account name and then “Groups”
- Create a New Group + (allow anyone to request access). Use an easily searchable group name (e.g. Bioconductor_PopUps), since I am a member of many unrelated groups.
- Add a User for each of my students, making each student a “Member”. I added the course TA as an “owner” to allow them to manage the group as well.
Create an anvil.terra.bio workspace
At this point, you need an existing billing account to connect the new workspace to. Under the “hamburger” menu at the top left, click “+” next to WORKSPACES:

Give compute permissions, option 1: on the shared workspace
Using this option, everyone will share the same workspace but will each have their own “persistent disk” attached to their RStudio or notebook runtimes.
Notes:
- Any files you make available through the workspace will be directly accessible using
AnVIL:gsutil_cp(). - Group members will only be able to compute on this workspace.
Steps:
- Click on the vertical dots in a circle on the top right-hand side.
- Click “Share”
- Type in name of the group created above, with the help of autocomplete. e.g., Bioconductor_PopUps@firecloud.org.
- Choose “Writer” and check the box “Can compute”
- “Save”
Give compute permissions, option 2: on the billing account
Notes:
- This will allow students to create new workspaces or do anything else on this billing account
- Students will work on clones of the workspace, not the same workspace itself

Steps:
- Under the top-left hamburger icon, clicked on your account name and then “Billing”
- Choose a billing project
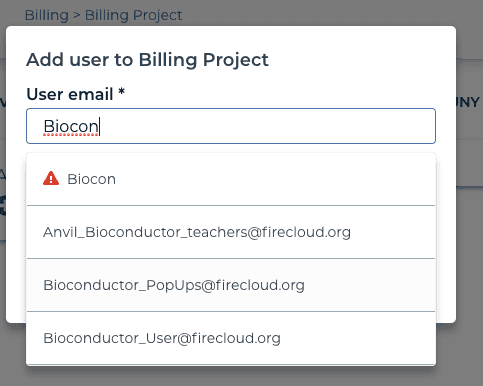
- Choose “Add a User”
- Add the group created above, e.g. Bioconductor_PopUps@firecloud.org
Course setup on GitHub
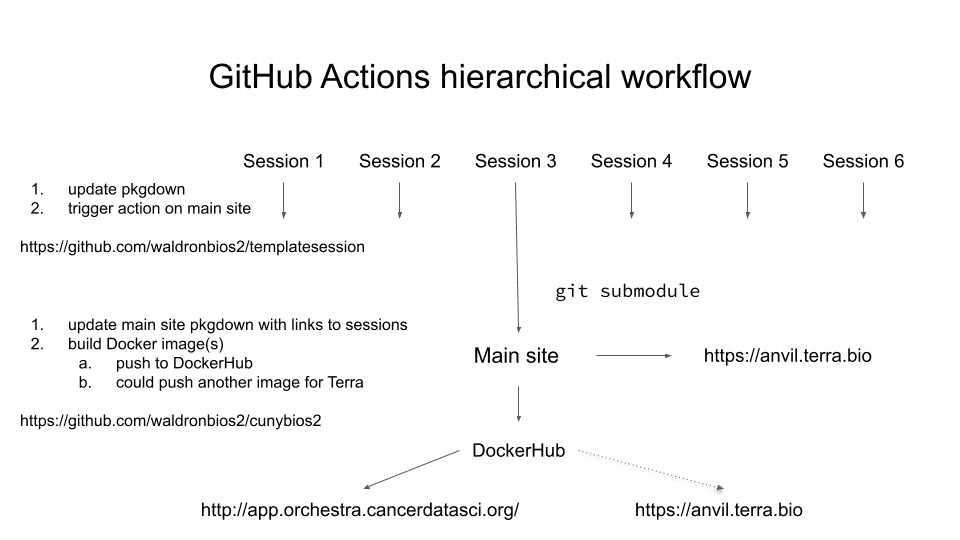
This course setup is GitHub-centric and uses AnVIL/Terra only as an end-user computing environment. It pulls data from GitHub or other online resources and does not use the AnVIL/Terra workspace for anything other than providing compute.
This setup is more complicated than you probably need: for most instructors, a single course GitHub repo would probably suffice, and you probably don’t need a course Docker image. In the simplest possible setup, create a single (private or public) course repo, and skip down to the section “Post AnVIL/Terra instructions to students.”

Source: 2021-05-24 GitHub + AnVIL-Terra course setup
You might use this setup as a template if you want to do any of the following:
- have independent R packages / GitHub repos for each of multiple course units
- have a central course GitHub repo that:
- auto-updates after a push to itself or any individual session repo
- builds a GitHub Pages site that links to each session
- builds a Docker image containing
- all needed packages for all sessions installed
- all materials from individual sessions, using git submodule
The main site
waldronbios2/cunybios2: Lecture and lab materials for CUNY SPH Biostatistics 2
- provides an auto-updating table linking to all 10 class sessions as git submodules
- creates a Docker image (Dockerfile) containing RStudio and all needed packages
- contains a GitHub Action to build the table, course pkgdown site (https://bios2.waldronlab.io/), and push the Docker image to DockerHub
- This Docker image is also auto-imported to http://app.orchestra.cancerdatasci.org/
Template sessions
- See https://github.com/waldronbios2/templatesession
- Its GitHub Action builds a pkgdown site for one class session and triggers a rebuild of the main site.
Note about GitHub Templates
Note, these are GitHub templates: if you want to copy them as a starting point, choose Use this template instead of forking to create stand-alone repositories with their own issues, etc.

Main site: https://github.com/waldronbios2/cunybios2 Template session: https://github.com/waldronbios2/templatesession
Post AnVIL/Terra Instructions to Students
The Workspace is a good place to give step-by-step instructions to students for getting started. I’ve used versions of the following for my classes, and it will make a good boilerplate starting point. Skip the “git submodule” commands if you decide not to use git submodules. Here is the text I have currently placed on the Workspace for this workshop.
Getting Started on this Workspace as a Student
- Sign in using a Gmail address, and let me know that Gmail address.
- Go to our course workspace If I've added you to the workspace it will appear under your "View Workspaces" as "Teaching on AnVIL popup workshop".
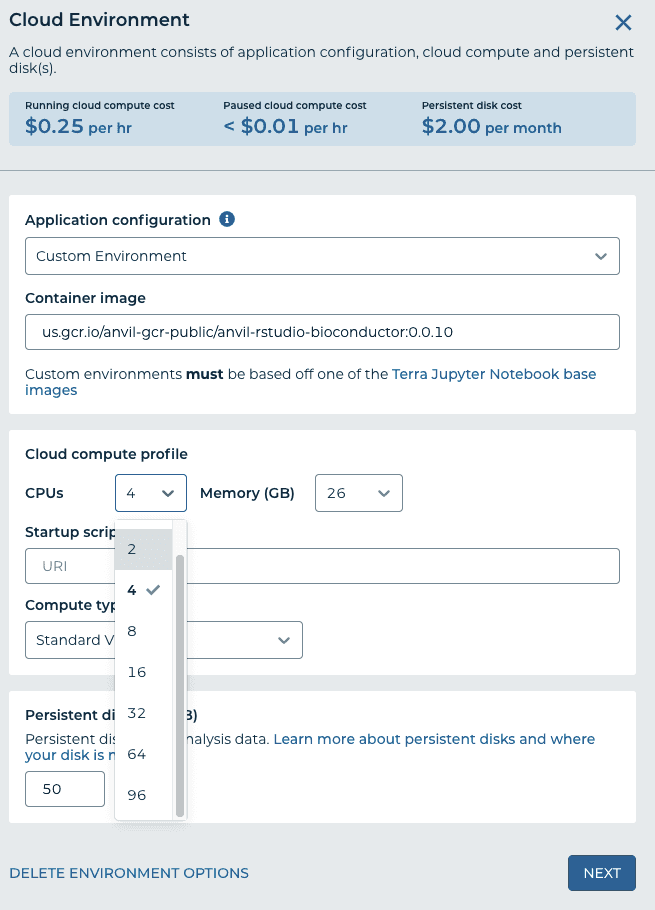
- At the top right, click on "Cloud Environment" and click "Customize".
- Under "Application Configuration" choose a community-maintained RStudio environment, "RStudio". You can also reduce the number of CPUs to 2 and the persistent disk size to 20GB to reduce the costs unless you need more. You can always increase them later at any time. If nothing happens, it's because I haven't added you to the workspace yet to grant you free computing - otherwise, you would have to set up a billing account. Click "Create".
- You should then see an R icon in the top-right hand corner, which starts RStudio in your browser. The first time you do this, or after you haven't used it for some hours, it will take a minute or two to start up. You won't have to repeat steps 3 or 4 next time unless you want to change your compute resources.
Terra will pause the computing environment automatically after a period of inactivity to avoid unnecessary costs, and you can tune the compute resources to what you need for your analysis, so it's a pretty nice system! You upload and download files through RStudio. Your work will remain saved on your persistent disk.
Cloning course materials from git submodules for students
- In RStudio, select "File - New Project" (no need to save workspace image, I never do. That's a copy of any objects in memory in your R session, but you want to create these with your script anyways)
- Choose "Version Control" then "Git"
- Enter the URL: https://github.com/waldronbios2/cunybios2.git. Also enter any directory name (e.g. "lectures and labs" or "cunybios2"), and click "Browse" to choose the current directory. Then click "Create Project"
- On the bottom left-hand quadrant of RStudio, click "Terminal". In the terminal, enter the following two commands:
git submodule init git submodule update - That's it! You can now find 10 sessions worth of lecture and lab code, e.g. in "File - Open" or the file browser, click on "Session1" and "vignettes" to see the lecture and lab materials. Once you open a Rmd file you can click "Knit" to build it.
Please let me know about your experience using the Terra/AnVIL Cloud environment, what you like, and what you don't like.
Making Commits to GitHub from AnVIL/Terra
Authenticating to make commits to GitHub from AnVIL/Terra is a bit different than local GitHub use. You can use the ssh approach or the HTTPS approach. Although I always use the ssh approach locally, I haven’t decided yet which is better for use on AnVIL/Terra.
In the ssh approach, you create a different ssh keypair in the persistent disk for each Workspace. In the HTTPS approach, you can use the same or different GitHub Access Tokens for each Workspace persistent disk. In the ssh approach, you will authenticate using your ssh keypair and a passphrase you should set when creating the keypair. In the HTTPS approach, you will authenticate with a text “access token” generated by GitHub.
ssh Approach
Clone the GitHub repo using the SSH option under Code, which starts with “git@”. For example, git@github.com:waldronlab/AppStatBio.git. In your AnVIL/Terra RStudio session:
- Use the “Terminal” in RStudio to type:
ssh-keygen. It is probably a good idea to use a passphrase for your ssh key any time you are storing it remotely, otherwise anyone with access to the key pair generated will be able to act as you on GitHub. I understand that your notebook/RStudio runtime “persistent disk” is normally not shared, but it might be easy to copy/backup your keys to a shared workspace volume. It just seems much safer to use a passphrase for your ssh keys in this context. - Type
cat ~/.ssh/id_rsa.puband copy the output to the clipboard. - At https://github.com/settings/keys, choose “New SSH key”, give it a useful title like “My first Terra Workspace” and paste the key here.
- Clone any GitHub repos using the “ssh” option, and you should then be able to push back to GitHub.
HTTPS Approach
Clone the GitHub repo using the HTTPS option under Code, which starts with “https”. For example, https://github.com/waldronlab/AppStatBio.git. In your Terra RStudio session, enter the “Terminal” to configure your user, for example:
git config --global user.name lwaldronIf you’re using 2FA for github.com (as you should be), you now have to create a GitHub personal access token using instructions from https://docs.github.com/en/github/authenticating-to-github/creating-a-personal-access-token instead of using your login password. The process is:
- https://github.com/settings/tokens/new
- Add a note like “Terra workspace 1”, select “repo”, then “Generate token”
- Copy the long token provided, and use it in place of your password to authenticate by HTTPS.
This token can be deleted at any time to remove access from anywhere it is being used.
In RStudio, use the git menus to commit and push. You will be asked for your username and password the first time that you push after a runtime is opened. Use your usual GitHub username, and the token created above for your password. Note, you have to store this text token somewhere because it is only visible once from GitHub.
Set up Billing
Option 1: Direct from Google
- Follow instructions at Set up billing with $300 Google credits to explore Terra to enable billing for your own projects.
Option 2: Use a Reseller
Using a reseller likely requires some work to set up an agreement between your institution and the reseller, but provides some advantages:
- No additional cost over direct billing from Google
- Pay by invoice rather than credit card (i.e. pay directly from the grant)
- Integration with NIH STRIDES program
- An extra layer of protection against overspending
- Additional budgeting and cost visualization tools

My impression is that academic collaborations are a small but valued part of these reseller company’s business, that they have a lot of Cloud computing expertise, and are willing to provide personal customer support at a level not available directly from Google or AWS.
I had to set up Onix as a “vendor” for CUNY, which included an IT security review and a legal review of their contract. There was actually back & forth on language in the contract before it was agreed and fully executed. This took several months, but the people at Onix were active in working directly with the university people to make it happen. Now, anyone else at CUNY can use Onix without having to do any of this.
Dana-Farber provides a good example of institutional streamlining of this process for other researchers at the same institution (they also use Onix, to provide STRIDES discounts (see below): https://informatics-analytics.dfci.harvard.edu/nih-strides-initiative-gcp-account).
NIH STRIDES
The NIH Science and Technology Research Infrastructure for Discovery, Experimentation, and Sustainability (STRIDES, https://datascience.nih.gov/strides) program is open to all NIH-funded organizations and institutions. It provides some services and training, including enhanced support agreements with Google and AWS. It also provides discounts on commercial cloud services (Google, AWS, maybe others to come).
Using NIH STRIDES requires setting up an agreement like noted above between your university and a commercial reseller. I use Onix (https://www.onixnet.com/contact-onix) for both Google and AWS, but two other companies are also listed at https://cloud.nih.gov/about-strides/partners/: https://www.carahsoft.com/google for Google, and https://www.4points.com/contract-vehicles/nih-strides-initiative/ for AWS.
An NIH STRIDES account works exactly the same way as the reseller option above, except that each billing account is linked with an NIH grant.
STRIDES discounts typically range from 10-25%, depending on the cloud service provider, and the specific services used.
Note About Costs
With modest compute requirements, the costs on Google Cloud are very low. AnVIL/Terra’s auto-off feature prevents unintentional costs from leaving a runtime on. Typical running cloud compute cost in AnVIL/Terra is $0.25 per hour (4 CPUs, 26GB RAM); maximum is $5.69 per hr (96 CPUs, 624 GB RAM). However, one student willingly running up the costs could necessitate shutting down the free offering. I don’t currently know how to identify that student if it were to happen.

Alternatives to AnVIL/Terra
Pros and cons according to Levi (open for debate and correction)
- rstudio.cloud
- Pros: simpler, more R-focused, more polished/mature interface.
- Cons: More expensive, less scalable, no special access to NIH data or discounts
- Microsoft Azure Databricks
- Pros: Simpler integration between workspace and notebooks / RStudio in the native interface using the Databricks File System (DBFS); Azure will be joining AnVIL/Terra soon.
- Cons: less experience in our community. Honestly, I used Azure Jupyter Notebooks a few years ago but haven’t tried the new Databricks thing.
- Renku
- Pros: Free, non-commercial (ETH / EPFL Swiss Data Science Center). Simple to use any DockerHub image.
- Cons: No “persistent disk”, preserving a file between sessions requires committing to a GitLab project: good for reproducible analysis, but may have a learning curve for students. Available free resources are limited (currently 1GB for datasets), although you could set up Renku on any Kubernetes cluster (https://renku.readthedocs.io/en/latest/admin/index.html) and you can request additional resources for specific purposes.
- http://app.orchestra.cancerdatasci.org/
- Pros: Free (runs on Google but currently funded by NCI, managed by Sean Davis). Runs any service from any image on DockerHub on request from Sean Davis, with no additional setup.
- Cons: No persistent disk, any installed packages or modified files are lost after 8h. Available free resources are limited.
- Run your own RStudio Server
- Pros: Might be free and have large resources.
- Cons: You are responsible for security, maintenance, and downtime. Institutional servers are usually behind firewalls.
- Students’ own Computers
- Pros: “Not my problem”
- Cons: Outdated software leads to package installation problems. Lost work. Very unequal resources.
